

Prepreg Autoclave Hand Layup
Highest laminate quality. Low void content, even and low resin content.
Thickness and ply angle optimisation.
Single sided and hence tooling cost is tolerable for low production volume.
Complex shapes can be achieved.
Very good surface finish.
Very high fibre fraction.

Lay up rate is very low.
End quality is craftsmen skill dependent.
High cycle time.
Process
The prepreg plies are laid up and smoothed by hand onto the tool surface, vacuum bagged and then placed in an autoclave to provide heat and pressure to compact the reinforcement and to cure the resin.
Heat is applied, ramped up gently to ensure an even temperature over the part, up to a maximum of 120C. For applications needing to sustain greater heat than solar heating, this can go up to 250C, such as parts subjected to engine heat or supersonic airflow. The heat flow into the part is fast since the compressed air density is high and hence has a high thermal capacity and conductivity. This allows the resin to reduce in viscosity, causing the plies to slip and compress, minimising resin and trapped air pockets.
An additional 2 – 6 Bar pressure is provided by a compressor. This compacts the fabric or tape to minimum thickness at a fibre fraction of 52-62% by volume, the minimum level needed to bond the fibres and provide fracture toughness. Any voids trapped between the plies are compacted and mostly dissolved by the applied pressure.
Material Options


Process Features, Benefits and Issues
The sticky material, with net resin content added by the manufacturer, allows laminators to place cut pieces (plies) into complex curvature by draping to force fibres to cover surfaces through material shearing. The stickiness allows complex shapes to be formed since the material stays where pressed.
The included resin eliminates the impregnation step, but requires frequent vacuum bag debulking (every few plies or around each mm of thickness applied) before curing to prevent fibre wrinkling. It therefore has very low rate material deposition and so best suits thin, high curvature parts with very high value and very low production rate – possibly 10 parts per day for small parts and 1 part per day for large parts.
A Formula 1 racing car monococque requires 4-6 laminator weeks to produce, and a fighter aircraft wing skin around 2 - 4 laminator weeks.
Prepreg autoclave provides the highest level of surface shape complexity, lay up angle and thickness tailoring, and the highest fibre fraction - typically 52% fibre for woven fabrics and 60% fibre for tapes. A small – 1m diameter 2m length – autoclave costs around £200 000.
For performance critical parts, skilled laminators are required to eliminate ply wrinkling and void entrapment ensure that the achieved lay-up meets the specified design.
Thickness variability can be caused by ply slipping during autoclave consolidation, or resin flow can be caused by varying tooling pressure.
Process Guidelines
1. Cut plies
2. Apply release agent
After mould surface treatment with a release agent to prevent bonding, the first layer of plies is applied.
3. Lay up
Apply plies to the mould tool surface in a pattern, orientation and number of layers as specified by a lay-up book.
This is the most critical layer for providing an even surface finish and may require the use of a hot air blower (hair drier) to help tack the prepreg to the surface.
Air is squeezed out using a smooth plastic ‘dibber’ – shearing prepreg over any double curvature and possibly cutting darts to cover – especially in many corner regions.
Key issues are the elimination of wrinkles, staggering of ply drop positions from layer to layer to avoid thickness steps greater than the ply thickness – where features; such as stiffeners, part flanges, pad up regions for bolting, need to be co-cured – they should have a taper for each edge of at least ¼ - taper thickness to taper length.
4. De bulk
At every few ply thicknesses – around 1mm of laminate, the lay up should have a vacuum bag debulk. A Polyamide (Nylon) film bag sealed over the part edge, a vacuum applied for 30 minutes – such that the layers are compacted. This process helps reduce fibre wrinkling and void content.
The bag is removed and laminating continued with the process repeated until the lay up is complete.
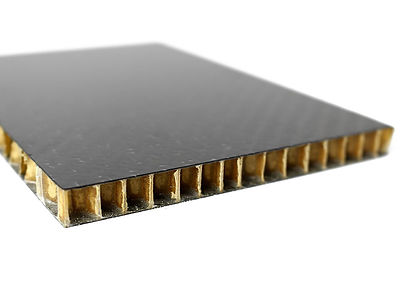
5. Sandwich Panels
To provide very high bending stiffness or to prevent bucking of plates in compression, prepreg lay up frequently includes honeycomb or foam cores, which have edge tapers these have to be included with careful ply placement to avoid wrinkling or crushing. Over all core surfaces, film adhesive is placed to ensure strong adhesion, unless a high resin content adhesive has been selected.
6. Cure Consumable Application
During cure, the main process is the compaction to minimum thickness, where resin is squeezed from the plies such that a sufficient resin content remains to just fill the gaps between fibres, without adding extra resin weight through spacing the fibres. A simultaneous process of void removal needs to occur.
Water on the prepreg surfaces and absorbed as well as some air entrapped between the ply layers needs to be removed. This is achieved predominantly through the laminate edges, but these need to be connected to the vacuum pump connections to the vacuum bag over the part upper (bag facing) surface.
To provide a connection for air flow, the whole laminate bag facing surface is covered by several layers of single use sheets – either starting with a peel ply – a release agent treated polyamide woven fabric - this when peeled away gives a matt, rough surface which is ready for bonding, or starting with a pin prick plastic film (FEP) again which doesn’t bond to resin – its tiny holes allow air and moisture to ‘seep’ through, without allowing more than a few drops of resin to pass through the film.
This or these two layers are then covered with a ‘breather’ fabric which allows the removed air and moisture to travel to the vacuum pump. These are illustrated in the Figure 1 at the top of the page.
7. Resin Curing
As the lay up plies are compacting and air & moisture being removed, the resin is hardened through gelation and crosslinking. The temperature of the laminate is varied through three stages. The dwell stage is that at which the resin is heated to around 60 – 80C at which its viscosity has dropped through easier polymer chain sliding – the main fibre compaction occurs at this stage. Towards the end of this stage, the resin polymer chain crosslinking rate accelerates and the resin gels into a rubbery state. The second stage is a temperature ramp to the curing temperature at which the crosslinking density is built up to provide the resin stiffness and strength required to transfer load between fibres and prevent fibre buckling with compression loading. This process can be achieved in less than 1 hour for thin laminates for lightly loaded applications; but for thick laminates more time is needed for heat to conduct through the laminate thickness.
The resin crosslinking process produces heat (exothermic) and so thick (>5mm) laminates need a slow curing temperature ramp rate of 0.5 C – 1C per minute otherwise there is a risk of laminate areas having runaway self-heating and part scrap or fire. Curing very high value parts at above 150C is frequently carried out using compressed Nitrogen gas instead of air to eliminate fire risk. Any curing above 250C should use Nitrogen.
For safety critical applications in thick parts, the cure may take over 5 hours to ensure an even temperature as possible over the whole part. This also minimises shrinkage stresses which build up if layers cure at different rates. These can manifest themselves as part warpage and hence cause assembly complications. A general guideline is to cure with as slow a temperature ramp and as long a time at curing temperature as the production rate allows. Ramping at 1 C / minute is a practical safe rate.
8. Demoulding and trimming
The part has the consumable layers peeled away and discarded prior to edge trimming. For applications requiring a net moulded edge, a ‘rolled’ edge can be provided using some form of cord such a sealing O ring. This requires extreme attention to detail and may be a cause for part reject resulting from visible voids at the part edge. Areas to be bonded will require very thorough release agent cleaning and benefit from the use of peel ply – kept attached until the moment of adhesive application.
Key Manufacturing or Quality Issues
-
For performance critical parts, skilled laminators are required to eliminate wrinkling and ensure that the achieved lay-up meets the specified design
-
Thickness variability caused by ply slipping during autoclave consolidation or resin flow caused by varying tooling pressure
Equipment Suppliers
Autoclaves:
AIC, Scholz, LBBC
Vacuum bagging Consumables:
Aerovac, Tygavac, Airtech
Services
Tooling:
Formaplex
Materials
Prepreg:
Hexcel Composites, Cytec Solvay, Tencate, SHD
Hexcel M21

Cytec Solvay Motorsport MTM28
Cytec Solvay Aircraft MTM44-1